Notifications of quota overrun
If the creation or expansion of a resource (volume, instance, IP address, load balancer) results in an error, the most common cause is that the project quota has been reached. A general description of quotas can be found in the Project Quota section.
In this chapter, we describe how to identify which quota the error relates to, how to find the resources that are using it, and how to free up or increase it. The example messages are taken from the Atman Cloud dashboard and the openstack CLI client.
Checking quota usage
In the panel
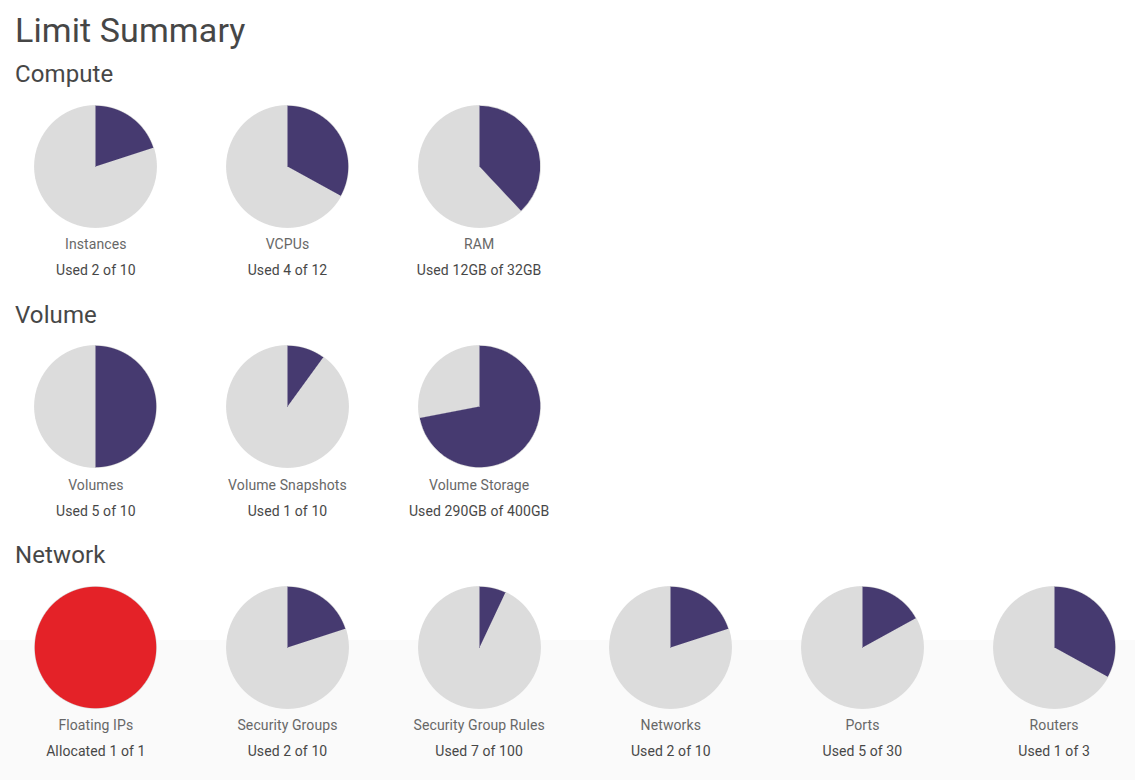
Quota usage is displayed on the Project -> Compute -> Overview screen, in the Limit Summary section. A red bar on the graph indicates that the quota has been fully utilised – in the example below, this applies to IP addresses (Floating IPs: Allocated 1 of 1).
In the CLI
Quota usage for instances, vCPUs, RAM and disk space:
$ openstack limits show --absolute
+--------------------------+-------+
| Name                     | Value |
+--------------------------+-------+
| maxTotalInstances        |    10 |
| maxTotalCores            |    12 |
| maxTotalRAMSize          | 32768 |
| totalRAMUsed             | 12288 |
| totalCoresUsed           |     4 |
| totalInstancesUsed       |     2 |
| maxTotalVolumes          |    10 |
| maxTotalSnapshots        |    10 |
| maxTotalVolumeGigabytes  |   400 |
| totalVolumesUsed         |     5 |
| totalGigabytesUsed       |   290 |
| totalSnapshotsUsed       |     1 |
...
The max… values are limits, whilst the total…Used values show current usage. RAM is given in MB.
The command displays limits on network resources (IP addresses, security groups, routers, networks, ports):
openstack quota show
PLEASE NOTE
The values for maxTotalFloatingIps, maxSecurityGroups and maxSecurityGroupRules returned by the openstack limits show command are out of date (they show, for example, -1). Network resource limits should be checked on the Overview screen or using the openstack quota show command (the floating-ips, secgroups and secgroup-rules fields).
Disk space quota exceeded
This is the most common scenario. It occurs when creating or extending a volume, creating a snapshot, and also when creating an instance (an instance’s system disk is also a volume).
Message in the panel
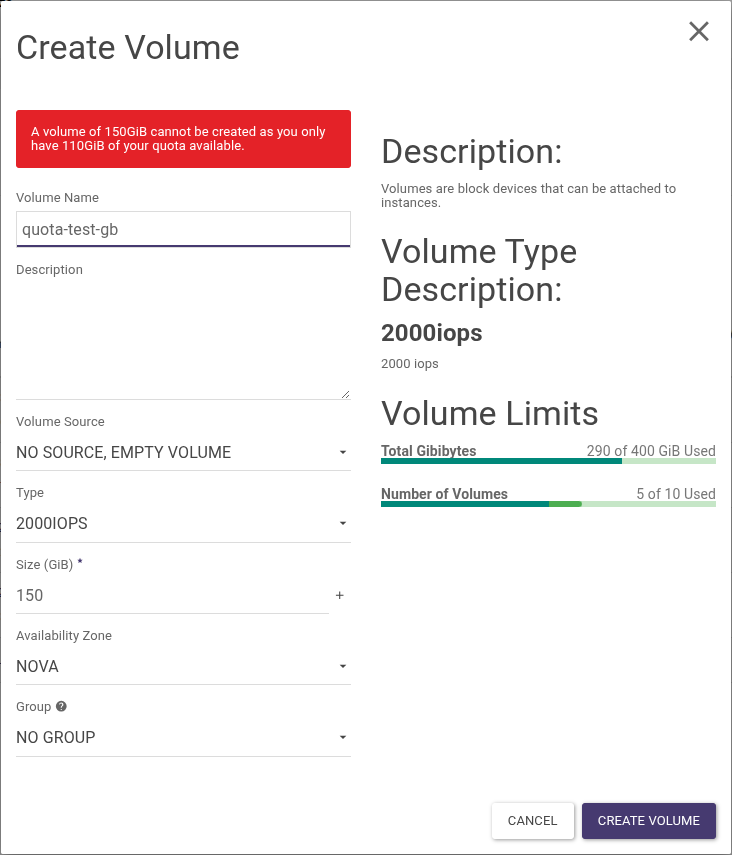
When creating a volume (Project -> Volumes -> Volumes -> Create Volume), the quota usage is displayed in the Volume Limits section. If the specified size exceeds the available quota, the Total Gibibytes bar turns red, and when you click Create Volume, the following message appears:
A volume of 150 GiB cannot be created as you only have 110 GiB of your quota available.
CLI message
$ openstack volume create --size 150 --type 2000iops nowy-wolumen
VolumeSizeExceedsAvailableQuota: Requested volume or snapshot exceeds allowed gigabytes quota. Requested 150G, quota is 400G and 290G has been consumed. (HTTP 413)
The message contains all the necessary information: the requested size (150G), the quota (400G) and the current usage (290G). In this example, only 110 GB is available.
STEP 1. CHECKING DISK USAGE BY DISK TYPE
Each type of storage space has its own quota, and there is also a total quota of gigabytes. The command displays usage broken down by type:
$ cinder quota-usage <project_id>
+--------------------------+--------+----------+-------+-----------+
| Type                     | In_use | Reserved | Limit | Allocated |
+--------------------------+--------+----------+-------+-----------+
| gigabytes                | 290    | 0        | 400   |           |
| gigabytes_2000iops       | 210    | 0        | 400   |           |
| gigabytes_8000iops       | 80     | 0        | 400   |           |
| gigabytes_15000iops      | 0      | 0        | 400   |           |
| snapshots                | 1      | 0        | 10    |           |
| volumes                  | 5      | 0        | 10    |           |
...
In_use – usage,
Reserved – space reserved by ongoing operations (e.g. volume creation),
Limit – the allocated quota; a value of -1 indicates that there is no separate limit for that type.
The command output also includes volume types that are not available in your project. You can view the available types using the openstack volume type list command – you can ignore the lines relating to the other types.
The names of the drive types in the dashboard, in the contract and in the quota correspond to one another as follows:
Type (contract, Customer Zone) |
Volume type in the panel |
Space quota |
|---|---|---|
Standard (2,000 IOPS) |
|
|
Fast (8,000 IOPS) |
|
|
Ultra (15,000 IOPS) |
|
|
Rapid (25,000 IOPS) |
|
|
If both the total quota and the type-specific quota are exceeded, the message indicates the total quota (gigabytes). A message containing the type name (e.g. gigabytes_2000iops) appears when there is still space available in the total quota, but the quota for that specific type has been exhausted.
STEP 2. IDENTIFYING RESOURCES THAT USE UP THE QUOTA
The disk space quota includes volumes and volume snapshots. List of volumes with their types:
$ openstack volume list --long -c Name -c Status -c Size -c Type
+---------+-----------+------+----------+
| Name    | Status    | Size | Type     |
+---------+-----------+------+----------+
|         | in-use    |  100 | 2000iops |
|         | in-use    |   50 | 8000iops |
|         | available |   20 | 8000iops |
|         | available |   10 | 8000iops |
| Volume1 | available |   10 | 2000iops |
+---------+-----------+------+----------+
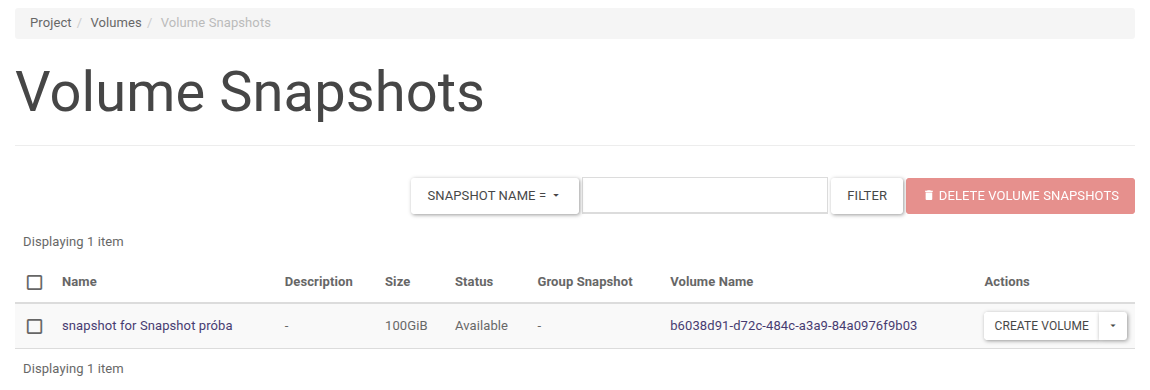
The total size of the volumes is 190 GB, whilst the quota shows usage of 290 GB. The missing 100 GB is taken up by a volume snapshot:
$ openstack volume snapshot list -c Name -c Status -c Size
+-----------------------------+-----------+------+
| Name                        | Status    | Size |
+-----------------------------+-----------+------+
| snapshot for Snapshot próba | available |  100 |
+-----------------------------+-----------+------+
In the panel, volume snapshots are displayed on the Project -> Volumes -> Snapshots screen:
PLEASE NOTE – snapshot copies of instances
A snapshot of an instance running from a volume (the Create Snapshot action on the Project -> Compute -> Instances screen) creates two items:
an image on the screen under Project -> Compute -> Images with a size of 0 bytes (type Snapshot),
a snapshot of the system volume on the Project -> Volumes -> Snapshots screen, showing the full size of that volume (a snapshot named
snapshot for <copy name>).
A snapshot of a volume counts towards the quota, even though the image shows a size of 0. Deleting the image from the Images screen does not delete the volume snapshot – this must be deleted separately.
The quota also includes volumes that are not attached to any instance (status available), e.g. those remaining after the deletion of an instance created with the option Delete Volume on Instance Delete = NO.
STEP 3. REDUCING OR INCREASING THE QUOTA
The problem can be solved in one of the following ways:
Deleting unnecessary snapshot copies – the Project -> Volumes -> Snapshots screen, the Delete Volume Snapshot action, or the command
openstack volume snapshot delete <name_or_ID>. In the example above, this will free up 100 GB.Deleting unnecessary volumes with available status – the Project -> Volumes -> Volumes screen, the Delete Volume action, or the command
openstack volume delete <name_or_ID>. A volume for which snapshots have been taken cannot be deleted until those snapshots have been deleted.Creation of a smaller volume – within the available quota.
Increasing the limit – please contact your account manager to adjust your storage limits.
Deleting a volume or a snapshot is irreversible. Before deleting, please ensure that the volume does not contain any data you need.
vCPU or RAM quota exceeded
Message in the panel
In the instance creation wizard (Project -> Compute -> Instances -> Launch Instance), on the Flavor tab, flavours that exceed the available quota are marked with a yellow triangle next to the VCPUS or RAM column. When you hover the cursor over the icon, a message is displayed, e.g.:
This flavour requires more RAM than your quota allows. Please select a smaller flavour or reduce the number of instances.
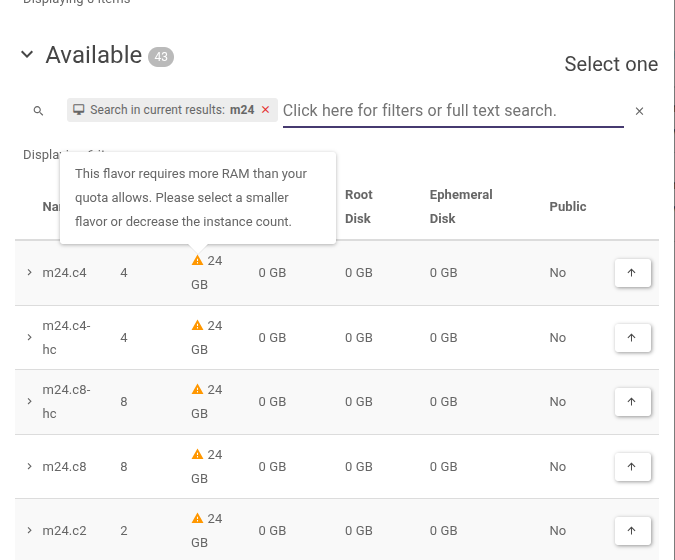
You cannot select this flavour.
CLI message
$ openstack server create --flavor m24.c2 ...
Quota exceeded for ram: Requested 24576, but already used 12288 of 32768 ram (HTTP 403)
$ openstack server create --flavor m32.c16 ...
Quota exceeded for cores, ram: Requested 16, 32768, but already used 4, 12288 of 12, 32768 cores, ram (HTTP 403)
The message specifies which quotas are affected (cores – vCPUs, ram – RAM in MB), how many resources the instance requires, how many are in use, and what the limit is.
Solution
choose a milder flavour,
reduce the size of another instance (Resize Instance),
delete an unused instance or switch it to SHELVED status – an instance in Shut Off status still occupies its vCPU and RAM quota,
Please contact your account manager to adjust your vCPU or RAM limits.
IP address quota exceeded
Message in the panel
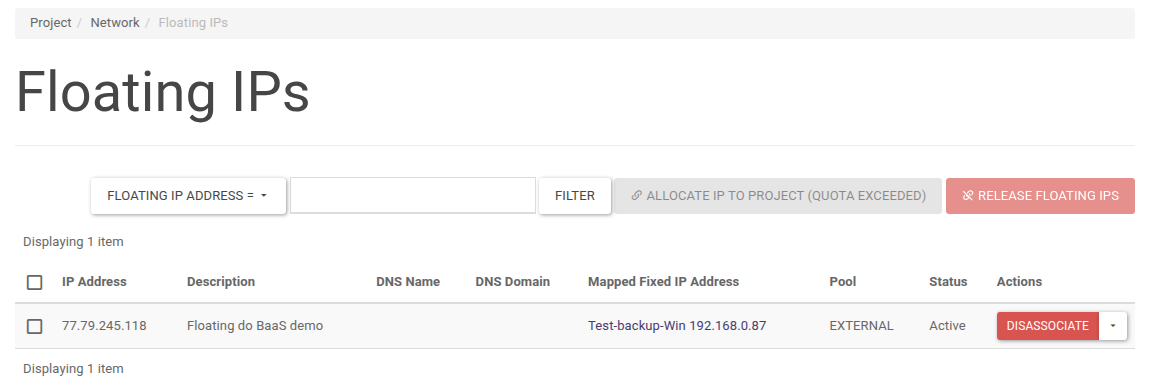
On the Project -> Network -> Floating IPs screen, the address allocation button is disabled and displays the message ALLOCATE IP TO PROJECT (QUOTA EXCEEDED).
CLI message
$ openstack floating ip create EXTERNAL
Error while executing command: ConflictException: 409, Quota exceeded for resources: ['floatingip'].
Solution
Release an address that is not assigned to any instance (the Mapped Fixed IP Address column is empty) – use the Release Floating IP action or the command
openstack floating ip delete <IP_address>. A released address cannot be recovered,Please contact your account manager to adjust the IP address limit.
Load balancer quota exceeded
CLI message
$ openstack loadbalancer create --vip-subnet-id <ID_podsieci> --name lb-www
Quota has been met for resources: Load Balancer (HTTP 403)
You can check the load balancer limit using the following command:
openstack loadbalancer quota show <project_id>
A value of 0 in the load_balancer field indicates that no load balancers have been allocated to the service. To change the limit, please contact your account manager.
Other quotas
The remaining quotas (number of volumes, snapshots, security groups and rules, networks, routers, ports) are checked in the same way – on the Overview screen or using the commands openstack limits show --absolute and openstack quota show. Error messages are similar to those shown above, e.g.:
Announcement (example) |
What is this about? |
|---|---|
|
number of snapshot copies of volumes |
|
number of volumes |
|
number of security groups |
|
the number of rules in security groups |
|
number of instances |
To amend these quotas, please contact your sales representative. Please provide the project name, the quota name, and the current and expected values.